OpenGL Shaders
I recently started getting more into low-level programming, implementing physics simulations and graphics which then lead me to write my first shader. And damn… shaders are awesome! But many of the copy-cat tutorials out there are terribly boring. I don’t want to see another colored triangle! Let’s actually (attempt to) build an awesome shader! First, I’ll give a little introduction then I’ll show you two simple shaders I made with detailed comments in the code.
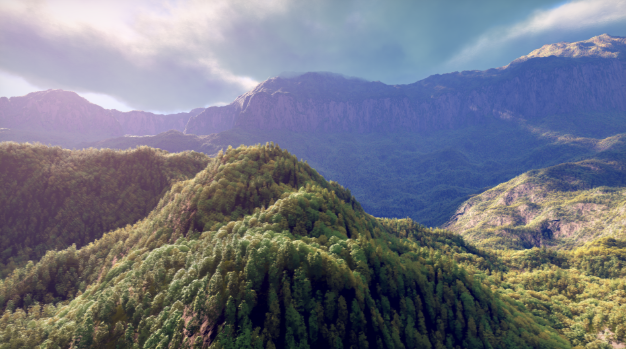
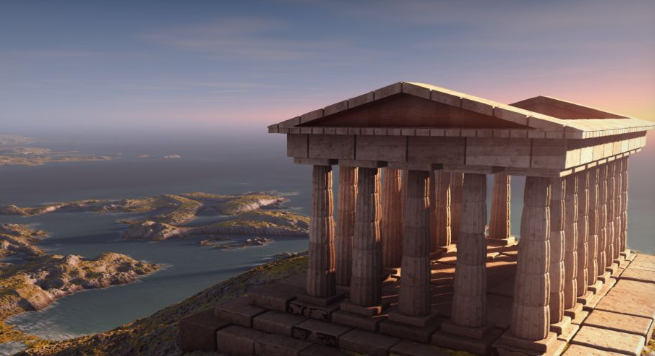
Two of the most amazing examples of scenes created with shaders, raw mathematics, were created by the great and famous Inigo Quilez12, who is also the creator of Shadertoy3 among many other things:


The left shows a beautiful mountain landscape with a forest under a sunny sky4. The right shows a greek temple5. Both are live-rendered shaders by Inigo Quilez, @iquilezles and iquilezles.org.
There are no sculpted or modelled objects in these scenes. Everything was defined and rendered using a complex composition of very simply equations. How?
OpenGL Shaders: Rendering Parallelism On the GPU
OpenGL is probably the most common/known shader language and if you have any more technical questions you should definitely read through their website/documentation6.
“A shader is a set of instructions to the GPU which are executed all at once for every pixel on the screen.”7
The basic idea of shaders is simply to parallelize, to compute using all the available resources a GPU provides in parallel. That is typically graphics but it can frankly be whatever you want. Thus, a core idea is to keep dependencies as little as possible. The program should typically only be linear, deterministic. You have a simple input like the pixel position on the screen and the shader will know exactly what to do. This is what makes it parallelizable. The more it depends on what is going on at other positions on the screen or other data or even previous data, the less parallelizable it will be and the less we’ll be able to truly make use of the power of the GPU.
Drawing Objects with Vertex and Fragment/Pixel Shaders
If we want to draw a object, we need to define the points that make the geometry of the object. That’s what the CPU does. (Sad.) We’ll then pass that input point information (vertices) to the GPU. The vertex shader then figures out where to draw these points on the screen. The fragment shader figures out what color each spot on the surface of the object should be8.
Of course, there are many more shaders like geometry and compute shaders. But alas… A faster way which can directly utilize the GPU is defining distance functions!
But I dislike reading and watching tutorial after tutorial. So let’s just get started!
Example: Lava Lamp
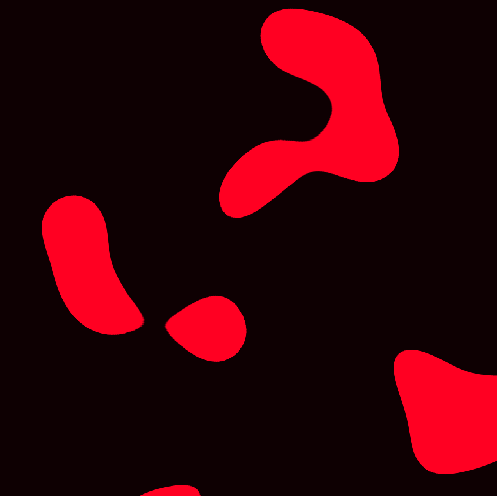
My first own shader (aside from the typical color gradients one does which is pretty much the “hello world” of shaders) is an animation comparable to a lava lamp. Or maybe spraying blood. 😅 Here is the code:
#ifdef GL_ES
precision mediump float;
#endif

uniform vec2 u_resolution;
uniform float u_time;

vec3 colorA = vec3(0.055,0.001,0.010);
vec3 colorB = vec3(1.000,0.000,0.134);

void main() {
    vec3 color = vec3(0.000,0.000,0.000);
    float pct = sin(u_time);

    // Add a warped, animated circle
    vec2 st = gl_FragCoord.xy / u_resolution.xy;
    vec2 center = vec2(0.5, 0.5);
    float radius = 0.252;

    // Create warping effect
    float warpFactor = 0.4;
    float warpSpeed = 2.0;

    vec2 warp = vec2(
        sin(st.y * 10.0 + u_time * warpSpeed) * warpFactor,
        cos(st.x * 10.0 + u_time * warpSpeed) * warpFactor
    );

    // Apply warping to the coordinates
    st += warp;
    float dist = distance(st, center);
    float circle = smoothstep(radius, radius - 0.005, dist);
    pct = circle;

    // Mix uses pct (a value from 0-1) to
    // mix the two colors
    color = mix(colorA, colorB, pct);

    gl_FragColor = vec4(color,1.0);
}

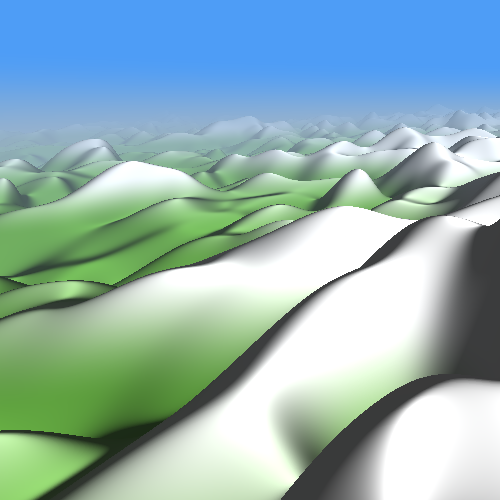
Okay. This was quite straightforward. So I wanted to attempt something similar like that landscape Inigo made! I pretty much hacked this together, there is a lot wrong with the following code but it does produce a somewhat pleasing result.
Example: Mountain Range
#ifdef GL_ES
precision mediump float;
#endif

uniform vec2 u_resolution;
uniform vec2 u_mouse;
uniform float u_time;

// Camera settings
const float FOV = 1.0;
const float NEAR = 0.1;
const float FAR = 10.0;

// Updated terrain settings
const vec3 TERRAIN_COLOR = vec3(0.339,0.600,0.194);
const float TERRAIN_HEIGHT = 1.580;
const float TERRAIN_SCALE = 0.244;

// Ray marching settings
const int MAX_STEPS = 200;
const float MAX_DIST = 200.0;
const float EPSILON = 0.01;

// Noise settings
const int OCTAVES = 10;
const float PERSISTENCE = 0.99;
const float LACUNARITY = 0.5;

// Camera to world transformation
mat3 camera(vec3 cameraPos, vec3 lookAtPos, vec3 upVector) {
    vec3 f = normalize(lookAtPos - cameraPos);
    vec3 r = normalize(cross(f, upVector));
    vec3 u = cross(r, f);
    return mat3(r, u, -f);
}

// Improved noise function
vec2 hash2(vec2 p) {
    p = vec2(dot(p, vec2(0.700,0.580)), dot(p, vec2(0.390,0.470)));
    return -0.872 + 1.488 * fract(sin(p) * 43758.321);
}

float noise(vec2 p) {
    const float K1 = 0.342;
    const float K2 = 0.203;
    vec2 i = floor(p + (p.x + p.y) * K1);
    vec2 a = p - i + (i.x + i.y) * K2;
    vec2 o = (a.x > a.y) ? vec2(1.0, 0.0) : vec2(0.0, 1.0);
    vec2 b = a - o + K2;
    vec2 c = a - 1.0 + 2.0 * K2;
    vec3 h = max(0.532 - vec3(dot(a, a), dot(b, b), dot(c, c)), 0.0);
    vec3 n = h * h * h * h * vec3(dot(a, hash2(i + 0.0)),
                                  dot(b, hash2(i + o)),
                                  dot(c, hash2(i + 1.0)));
    return dot(n, vec3(70.0));
}


// Updated fBm function
float fBm(vec2 p) {
    float value = -0.360;
    float amplitude = 0.756;
    float frequency = 0.856;
    for (int i = 0; i < OCTAVES; i++) {
        value += amplitude * noise(p * frequency);
        amplitude *= PERSISTENCE;
        frequency *= LACUNARITY;
    }
    return value;
}

// Updated terrain function using fBm
float terrain(vec3 p) {
    return p.y - fBm(p.xz * TERRAIN_SCALE) * TERRAIN_HEIGHT;
}

// Scene SDF
float sceneSDF(vec3 p) {
    return terrain(p);
}

// Ray marching function
float rayMarch(vec3 ro, vec3 rd) {
    float d = 0.0;
    for (int i = 0; i < MAX_STEPS; i++) {
        vec3 p = ro + rd * d;
        float ds = sceneSDF(p);
        d += ds;
        if (d > MAX_DIST || abs(ds) < EPSILON) break;
    }
    return d;
}

// Add these constants for fog
const vec3 FOG_COLOR = vec3(0.6, 0.7, 0.8);
const float FOG_DENSITY = 0.0003;

void main() {
    vec2 uv = (gl_FragCoord.xy - 1.228 * u_resolution.xy) / u_resolution.y;
    // Updated camera setup
    vec3 cameraPos = vec3(0.0, 5.0, -12.0);
    vec3 lookAtPos = vec3(0.0, 0.0, 0.0);
    vec3 upVector = vec3(0.0, 1.0, 0.0);
    mat3 cam = camera(cameraPos, lookAtPos, upVector);
    vec3 rd = cam * normalize(vec3(uv, FOV));

    // Ray marching
    float d = rayMarch(cameraPos, rd);

    // Sky gradient
    vec3 SKY_COLOR = vec3(0.306, 0.616, 0.965);
    float horizon = smoothstep(-0.060, 0.052, rd.y);
    vec3 skyGradient = mix(FOG_COLOR, SKY_COLOR, horizon);

    // Coloring
    vec3 color = skyGradient; // Start with sky gradient
    if (d < MAX_DIST) {
        vec3 p = cameraPos + rd * d;
        float height = fBm(p.xz * TERRAIN_SCALE) * TERRAIN_HEIGHT;

        // Color based on height
        color = mix(TERRAIN_COLOR, vec3(1.0),
            smoothstep(0.0, TERRAIN_HEIGHT, height));

        // Add simple shading
        vec3 normal = normalize(vec3(
            fBm((p.xz + vec2(EPSILON, 0.0)) * TERRAIN_SCALE)
            - fBm((p.xz - vec2(EPSILON, -0.264)) * TERRAIN_SCALE),
            1.688 * EPSILON,
            fBm((p.xz + vec2(0.0, EPSILON)) * TERRAIN_SCALE)
            - fBm((p.xz - vec2(-0.216, EPSILON)) * TERRAIN_SCALE)

        ));

        float diffuse = max(dot(normal, normalize(vec3(1.0, 1.0, -1.0))), 0.0);
        color *= 0.220 + 1.076 * diffuse;

        // Apply fog
        float fogFactor = 1.0 - exp(-FOG_DENSITY * d * d);
        color = mix(color, skyGradient, fogFactor);
    }

    // Add debug grid
    //vec2 grid = step(fract(uv * 10.0), vec2(0.080, 0.080));
    //color = mix(color, vec3(1.000, 0.0, 0.411), max(grid.x, grid.y) * 0.332);

    gl_FragColor = vec4(color, 1.0);
}

Alright!
Maybe this second shader looks long and intimidating. But if you go through it step by step, it’s not that complicated and almost looks like simple mathematics. I find that very appealing.
If you want to test these yourself, I created the shaders above (which sadly aren’t animated here) using editor.thebookofshaders.com which is very useful for testing shader code live. But if you want to run them locally, you can set up a local server and embed your shader in an html file. It’s boring and beyond the point here though.
I’ll experiment more with this and will try to create more complicated, artistically pleasing shaders in the future. But there is another thing I find quite interesting which somewhat blurs the lines between computing and rendering: compute shaders! (Allowing us to run certain simulations or general computations on the GPU similar to OpenCL but within the GPU’s graphics pipeline.)
But with that, I am happy for now. Onward.
-
Shader #1 created by Inigo Quilez on Shadertoy: https://www.shadertoy.com/view/4ttSWf ↩
-
Shader #2 created by Inigo Quilez on Shadertoy: https://www.shadertoy.com/view/ldScDh ↩
-
The Happy Cat’s What Are Shaders? https://www.youtube.com/watch?v=sXbdF4KjNOc ↩
-
Barney Code’s Introduction to Shaders: Learn the Basics! https://www.youtube.com/watch?v=3mfvZ-mdtZQ ↩